Introducing Nucleion
A deep dive into Nucleion, our multi-effect VST plugin featuring four reorderable effect engines - Grains, Filter, Reverb, and Chorus - built for sound design and creative mixing.
We’ve been building toward this one for a while. Nucleion is Full FX Media’s first paid plugin, and it’s a different kind of tool than our free offerings. Where Setekh and Diffusia each do one thing well, Nucleion is a full multi-effects engine - four distinct effect modules, all in one plugin, all reorderable.
Here’s what’s inside and how it all fits together.
What Makes Nucleion Different
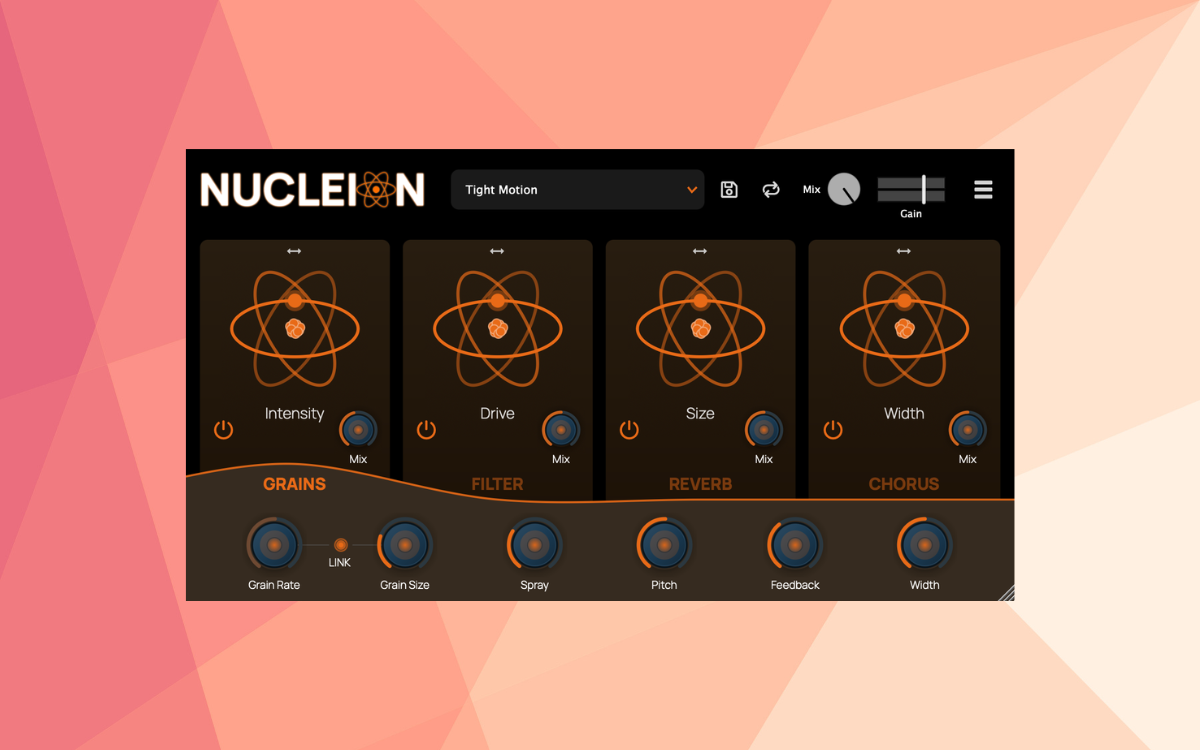
Most multi-FX plugins have a fixed signal chain: the order of effects is baked in and you work around it. Nucleion doesn’t do that. The four effect slots - Grains, Filter, Reverb, and Chorus - can be dragged into any order, and the signal flows through them in whatever sequence you choose.
That sounds simple, but it changes everything. Running your signal through a filter before the reverb gives you tight, controlled space. Flipping it - reverb first, then filter - lets you sculpt the reverb tail itself. Put the grain engine last and it tears apart an already-processed signal into something unrecognizable. The same four effects, completely different results depending on order.
Each slot also has its own bypass toggle and dry/wet mix control, so you can blend any effect at any amount without committing to full wet. There’s also a global Mix knob and Gain slider at the top for overall output control.
The Four Engines
Grains
The grain engine is a real-time granular processor. It takes your incoming audio, slices it into tiny grains, and scatters them back. The main controls are:
- Grain Rate - how densely grains are spawned. Low values give sparse, glitchy textures; high values build smooth clouds.
- Grain Size - the length of each grain in milliseconds. Shorter grains create washy, pitched artifacts; longer grains preserve more of the original source.
- Spray - adds random timing offsets to each grain, spreading them through time for a more diffuse, less rhythmic result.
- Pitch - shifts each grain up or down in semitones without changing timing, so you can detune or harmonize without affecting tempo.
- Feedback - feeds grain output back into the engine. Low amounts extend tails naturally; high amounts build into dense, resonant loops.
- Width - randomizes grain panning for stereo spread.
The macro slider on this engine controls Intensity, scaling the overall grain effect up or down. The Link toggle ties Rate and Size together so texture stays consistent as you change density.
Filter
A straightforward but flexible filter module - lowpass, highpass, or bandpass, with three slope options (6dB, 12dB, 24dB). Cutoff and resonance are the main controls.
The value of having it as a slot rather than a fixed EQ is the ability to place it anywhere in the chain. Filtering before the reverb keeps the room tight. Filtering after gives you control over what frequency range gets space. Filtering before the grain engine limits what frequencies get granulated.
The macro on this engine is Drive, which scales filter intensity.
Reverb
A room-model reverb with Size, Decay, Width, High Cut, and Low Cut. The controls are clean and musical:
- Size - the room dimension, from tight chambers to large, diffuse spaces.
- Decay - tail length and energy. Higher values mean longer, slower fade.
- Width - stereo spread of the reverb tail, from mono to full width.
- High Cut / Low Cut - frequency shaping for the tail. High Cut darkens the reverb; Low Cut thins the low end and tightens up muddy rooms.
The Darkness macro slider lowers high-frequency content and “blooms” the reverb, making it feel larger and more enveloping without touching individual parameters.
Chorus
A classic chorus/flanger built around LFO-modulated delay. The controls:
- Depth - the amount of delay modulation. Higher depth produces stronger pitch movement and chorusing.
- Rate - LFO speed in Hz. Slow rates feel lush and gentle; fast rates become more pronounced and shimmering.
- Delay - the base delay time around which modulation happens. Short times are classic chorus; longer times push toward flanger territory.
- Feedback - feeds the delayed signal back for added resonance. Use sparingly - high values introduce metallic tones quickly.
The Motion macro emphasizes modulation movement without touching individual parameters.
Global Controls and Presets
At the top of the plugin sit the global controls. The Mix knob blends the full wet signal against dry, and the Gain slider handles output volume with up to +3dB of boost (double-click to reset).
The Randomize button deserves a mention - one click randomizes every parameter across all four engines, including which ones are bypassed. It’s a fast way to stumble into something you’d never dial in manually.
Presets save and load the full state of all four slots - effect order, all parameters, bypass states, and mix levels. User presets show delete icons next to them in the dropdown.
Installation
Nucleion is available for macOS, Windows, and Linux in VST3, AU, CLAP, and LV2 formats.
After purchase, download the installer from your Full FX Media account and run it. When you first load Nucleion in your DAW, an activation screen will appear - log in to your account and it unlocks immediately. Offline activation is also available if needed.
If anything goes wrong during installation or activation, reach out at [email protected].
Nucleion is available now for $29 on the plugin page. A free trial is available if you want to hear it in your sessions before committing.